
Use the jump to recipe button below to skip directly to the recipe card, or keep scrolling for a more detailed walk-through of this recipe including my tips and tricks.
This post may contain affiliate links. See our disclosure policy here.
Don’t be intimidated by the idea of making your own homemade bread. Trust me, it’s a lot easier than it sounds. Is it quick? No, not really. I won’t lie to you. But is it worth the time? Absolutely. It’s cost-effective and you can feel good about avoiding all those extra ingredients that are in a lot of store-bought breads.
Flatbreads like this naan are no exception; it’s simple to make and cooks in a cast iron skillet in under 2 minutes. It’s soft, pillowy and fresh with just the right amount of chewiness. Plus, there’s no kneading required so it’s less hands-on time and more waiting impatiently while the dough rises instead.
Once you’ve tried this homemade version, I promise you won’t ever want to go back to store-bought naan. I know because that’s what happened to me, and now I usually make a double batch so that I always have some on hand in the freezer.
Table of Contents
- Quick Recipe Overview and Top Tips for Success
- Equipment You'll Need For This Recipe
- Ingredients You'll Need For This Recipe
- How to Make Homemade Naan Bread
- Substitution Ideas and Variations
- Recipe FAQs
- More Bread Recipes You Might Like
- Recipe Card
- Let me know what you think – leave a comment/review
- Follow me on Social Media
Quick Recipe Overview and Top Tips for Success
Tips for the best naan:
- Roll out your dough exactly 3-4mm thick according to the directions for perfect thin naan
- Make sure you heat and oil your cast iron skillet well (unless it’s already well seasoned) when you cook the naan to get the best crispy exterior and soft interior with those signature charred bubbles. If you don’t have a cast iron pan, see the recipe FAQs or recipe card for other suggestions
Flavors: This recipe makes stretchy naan with the perfect soft and chewy texture. The charred bubbles give the flatbreads their signature flavor. It’s the closest thing to perfect naan without a tandoor oven!
Difficulty: Because there’s no kneading required for the dough, and the naan cooks in under two minutes on the stove, this is an easy recipe.
Time: The dough comes together quickly, but needs time to rest. It rises pretty quickly, so you can have fresh, warm, homemade naan in about 2 hours.
Equipment You’ll Need For This Recipe
Here’s a quick list of necessary or helpful tools you’ll need to make Homemade Naan Bread:
- Cast iron skillet: for cooking the naan. You can also use any other kind of large skillet. See Recipe FAQs for tips if using a different skillet.
- Mixing bowls: you’ll need two mixing bowls for this recipe; one for mixing the yeast mixture, and the other for mixing the dough.
- Whisk
- Spatula: a silicone or wooden spatula both work great.
- Rolling pin: for rolling out the dough.
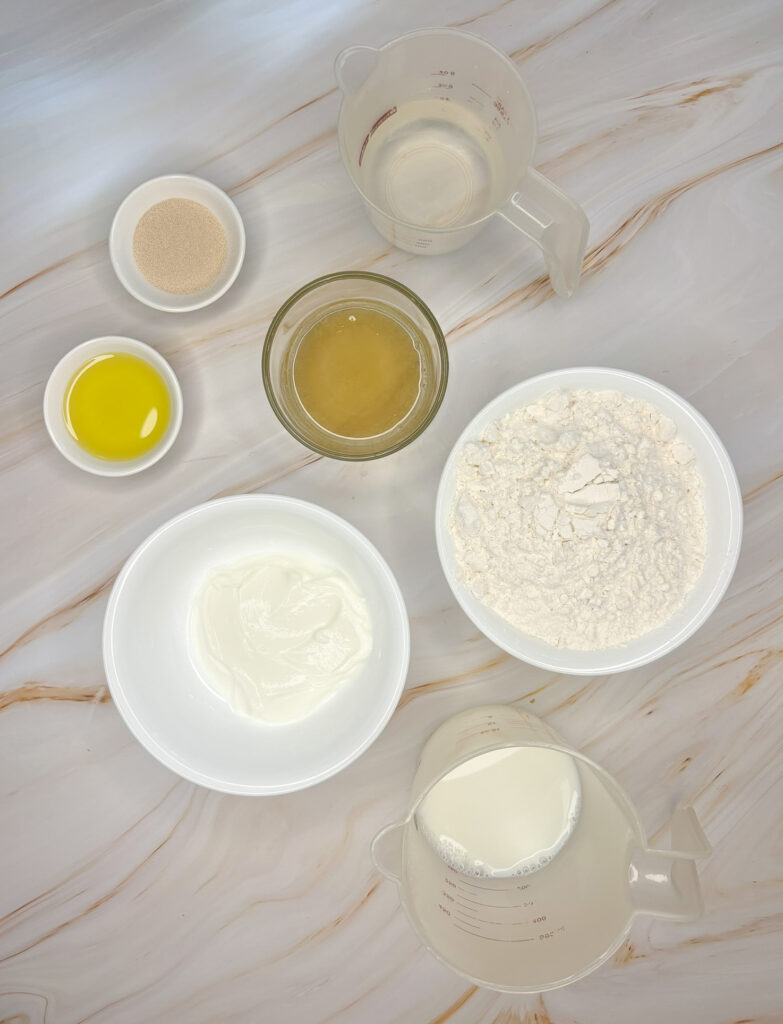
Ingredients You’ll Need For This Recipe
Here’s everything you’ll need to make Homemade Naan Bread from scratch, including the optional Garlic Butter:
For the Naan Bread:
- Instant yeast: to help the dough rise and give the naan its signature chewy texture.
- Warm water: make sure it’s between 100℉-110℉/38℃-44℃; if it’s too cold, the yeast won’t activate and if it’s too hot, you risk killing the yeast.
- Honey: a little honey feeds the yeast.
- Milk
- Greek yogurt: adds a great tangy flavor.
- All purpose flour
- Salt
- Avocado oil: for the dough, and for greasing the skillet.
For the Garlic Butter:
- Unsalted butter
- Salt
- Garlic
- Fresh cilantro: adds freshness and color.
How to Make Homemade Naan Bread
Naan bread is a flatbread with roots in Persia and India and is a staple bread in South Asian cuisine. Often, authentic naan bread is leavened (made with yeast or other leaveners such as baking powder), but many authentic non-leavened recipes have been adapted as well. You will likely find that naan ordered at a certain restaurant tastes different than another. Naan dough made with no yeast tends to yield thinner and slightly crispier flatbreads, while naan dough made with yeast tends to result in flatbreads that are a bit more doughy and fluffy.
This recipe uses yeast because I find it helps give the naan its signature pockets. There’s really no consensus on whether naan should be made with or without yeast, so it’s up to personal preference. Both versions are traditional and authentic, and both versions are delicious. All naan recipes should have one thing in common regardless of ingredients: they should result in soft, slightly stretchy flatbreads that are perfect for scooping up sauce. You can also just brush them with garlic butter and devour them warm (bread is an acceptable meal, right?).
The most traditional method for baking naan bread is using a tandoor oven. Sadly, I do not have a tandoor oven, so we’ll be using a cast iron skillet for this recipe (see Recipe FAQs below for other suggestions if you don’t have one). It’s not the same, but it’s close enough.
Here’s how to make this Homemade Naan Bread:
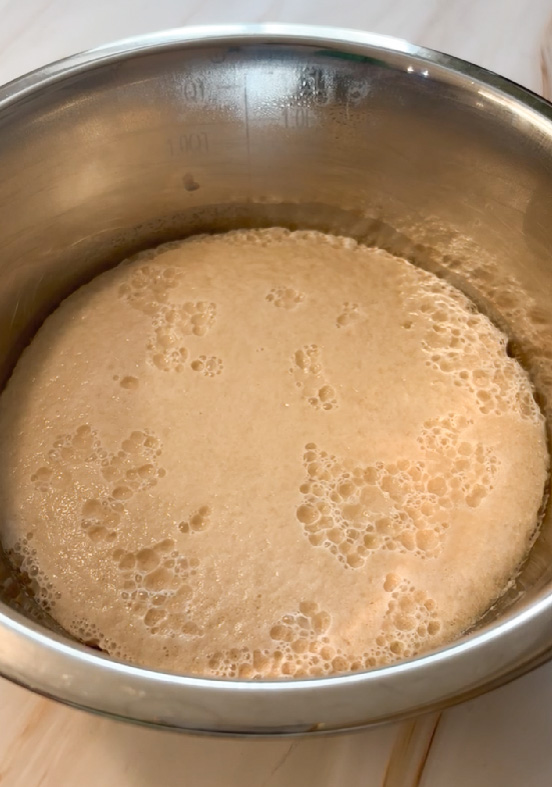
Make the Yeast Mixture
This recipe uses instant yeast, but we’re still going to let it bloom a little. Typically, you can add instant yeast to dry ingredients because it doesn’t need to be mixed with water the way active dry yeast does. However, I’ve found blooming the yeast and honey together allows for a more flavorful dough.
Start by combining the 1 tsp of instant yeast with the ¼ cup of warm water and the 1 tablespoon of honey and whisk that together. Make sure the water is between 100℉-110℉ (or 38℃-44℃). The temperature of the water is super important because if the water is too cold, the yeast will not bloom and if the water is too hot, it could kill the yeast.
In both cases, the dough will not rise properly, so make sure the water is in the right range of temperatures. I always recommend doing this with a thermometer, but if you don’t have one and you’re really stuck, test the water temperature by putting a few drops on your wrist. It should feel warm, but not hot.
Allow the yeast, water and honey mixture to bloom for 10-15 minutes. Once it gets bubbly and foamy, you’re good to go.
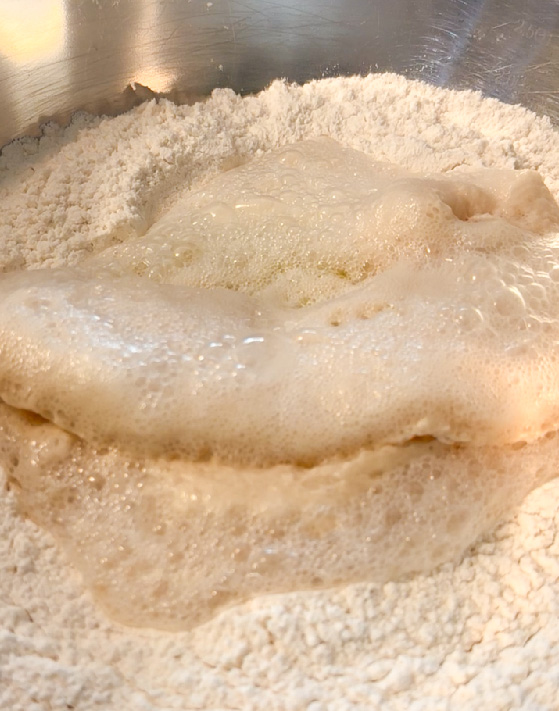
Combine the Dough Ingredients
Next, mix together the rest of the dough. In a large mixing bowl, whisk together the 1 ¾ cups of flour and the ½ tsp of salt. Then, using a spatula or a spoon, move the dry ingredients aside and create a well in the center of the bowl. In a separate measuring cup or bowl, whisk together the ¼ cup of milk and the ¼ cup of Greek yogurt. Or, if you don’t want to use an extra bowl, pour both into the well in the middle of the dry ingredients and gently whisk to combine the milk and yogurt. Pour the 1 tablespoon of avocado oil into the center of the bowl as well.
Pour the foamy yeast mixture into the center of the bowl with the other wet ingredients (it’s okay if it’s starting to mix with the flour, we’re about to mix it all together anyway). Once you’ve combined all your ingredients, mix the dough using a wooden spoon or silicone spatula (or use your hands; just make sure you dust them with flour so it’s not a sticky mess).
Make the Dough
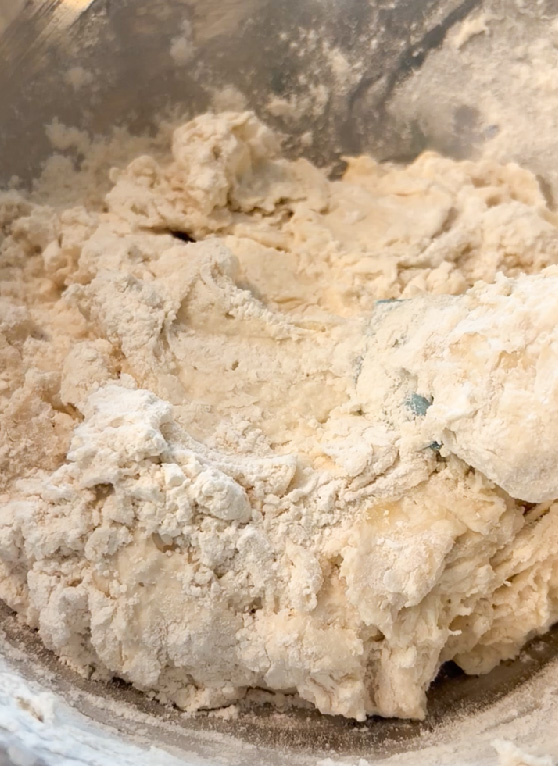
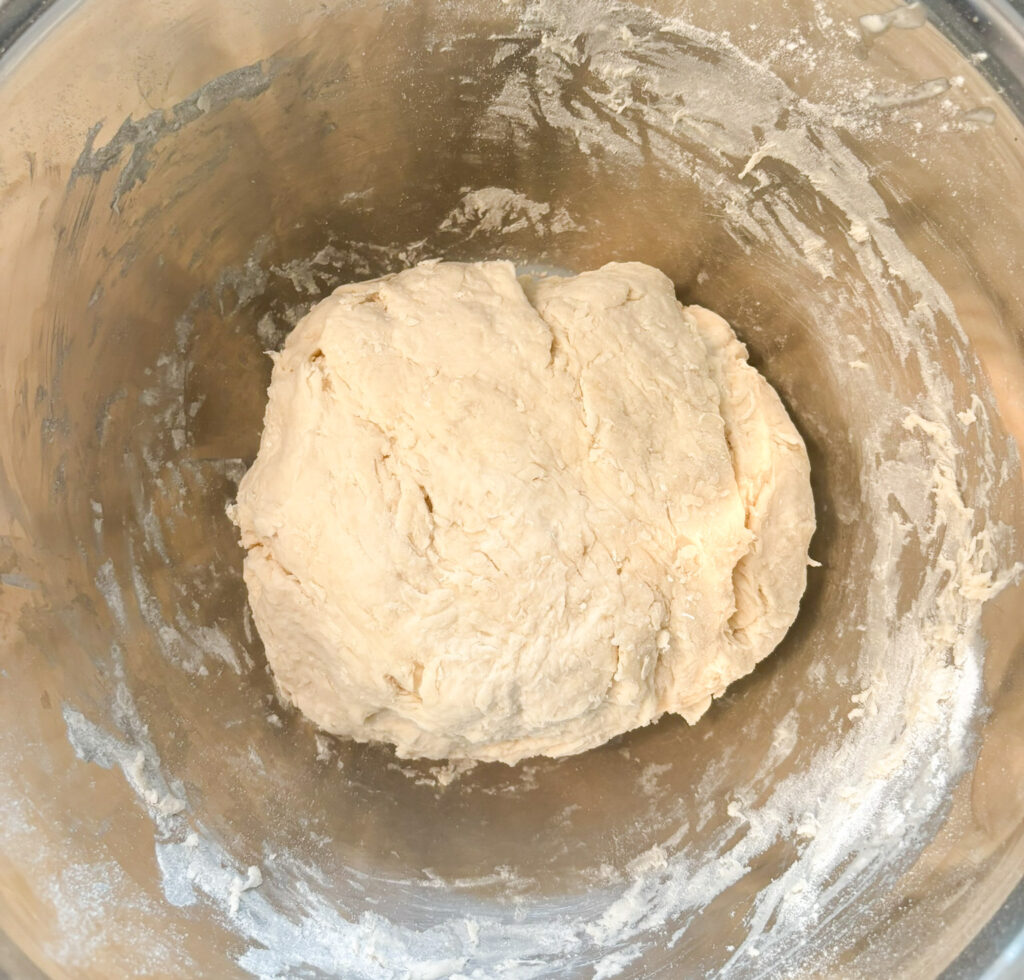
As you mix, the dry and wet ingredients will start to come together and form clumpy, sticky strands. Continue mixing until you’ve fully incorporated the flour. At first, it’s going to be very sticky with strands of dough throughout the flour. Don’t worry; as you continue to mix, the dough will come together. At some point, it’s going to become too difficult to do this with a spoon, so dust your hands with some flour and continue mixing with your hands. By now, the dough should be starting to form a rough ball and should be mostly stuck together with some flour throughout the bowl.
Roll and press the dough ball against the sides of the bowl as you mix to catch all those little bits of flour. If it’s still very sticky by this point, add 1 tablespoon of flour and continue mixing until you can form a fairly smooth ball (I mean like, ‘my hands are completely covered in dough’ sticky; if it’s only sticking to your hands a little bit, that’s okay because dough is always a little bit tacky to the touch).
Your dough is ready when all the flour is incorporated, the dough is no longer very clumpy and sticky, and it can be shaped into a ball. At this point you can stop mixing (your hands and wrists will be thankful).
Let the Dough Rest
This dough does not require kneading. We’re going to let it rest, so the gluten will develop on its own. Plus, you’ve already rolled it against the sides of the bowl (or at least I hope you have), which will have helped the gluten strands form.
Cover the bowl with clean tea towel or plastic wrap. Make sure the dough has a lot of room to rise so it doesn’t end up sticking to the towel.
Place the bowl in the warmest spot in your home. Avoid cold countertops if possible. Let the dough rest for 1 to 2 hours or until doubled in size. This could take longer depending how cool your environment is, so just keep an eye on it. Once the dough doubles in size, it’s ready.
Divide the Dough
Sprinkle some flour over a large work surface. Set aside a baking sheet or a very large plate with a little more flour, and dampen the tea towel you used to cover the bowl. Turn the dough out onto the surface. Using a sharp knife, cut it in half, then cut each half into 3 or 4 equal sized pieces. You can choose whether to cut your dough into 6 or 8 pieces depending on the size of naan you prefer. Sprinkle a little more flour onto your hands, then roll each piece into a ball.
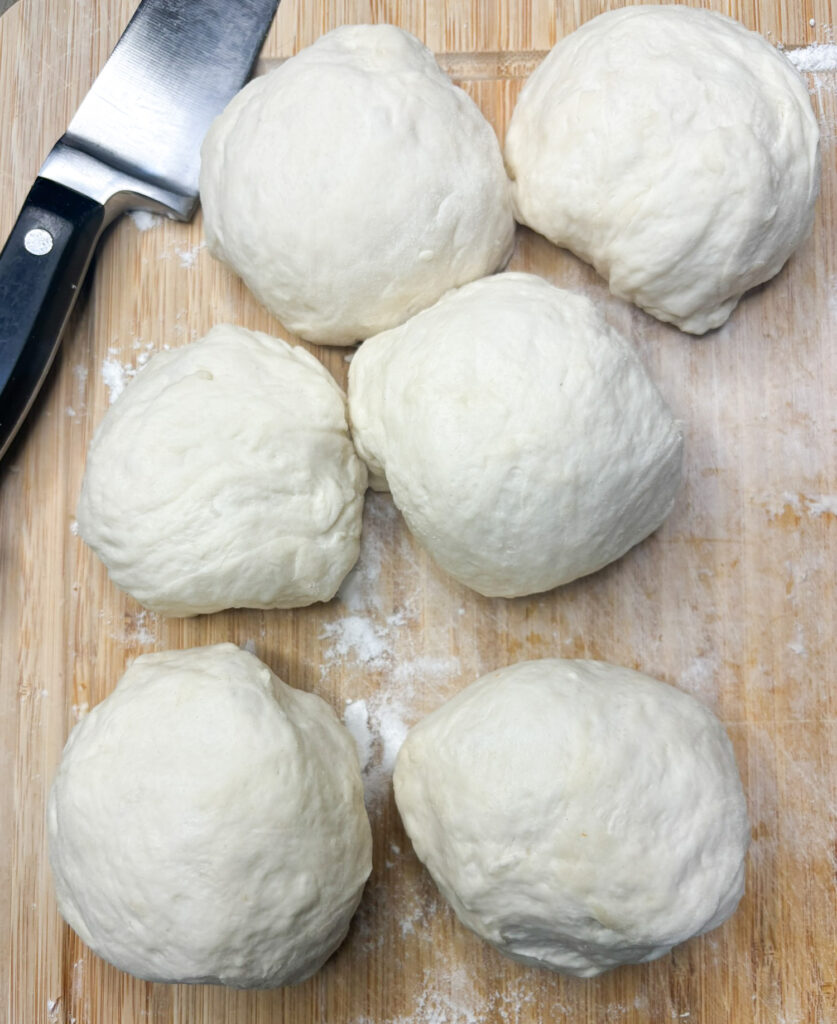
To create smooth tops, tuck the dough underneath the ball. To do this, hold the ball of dough in one hand. With your other hand, pinch the side and, working in a circle around the ball, gently pull the dough underneath the ball. Do this about 4-5 times per piece, and each dough ball will have smooth tops. They don’t need to be perfectly round or smooth though, because we’re going to roll them out anyway.
Once you’ve rolled 2 or 3, you may need to sprinkle your work surface or your hands with a little more flour.
Rest the Dough Again
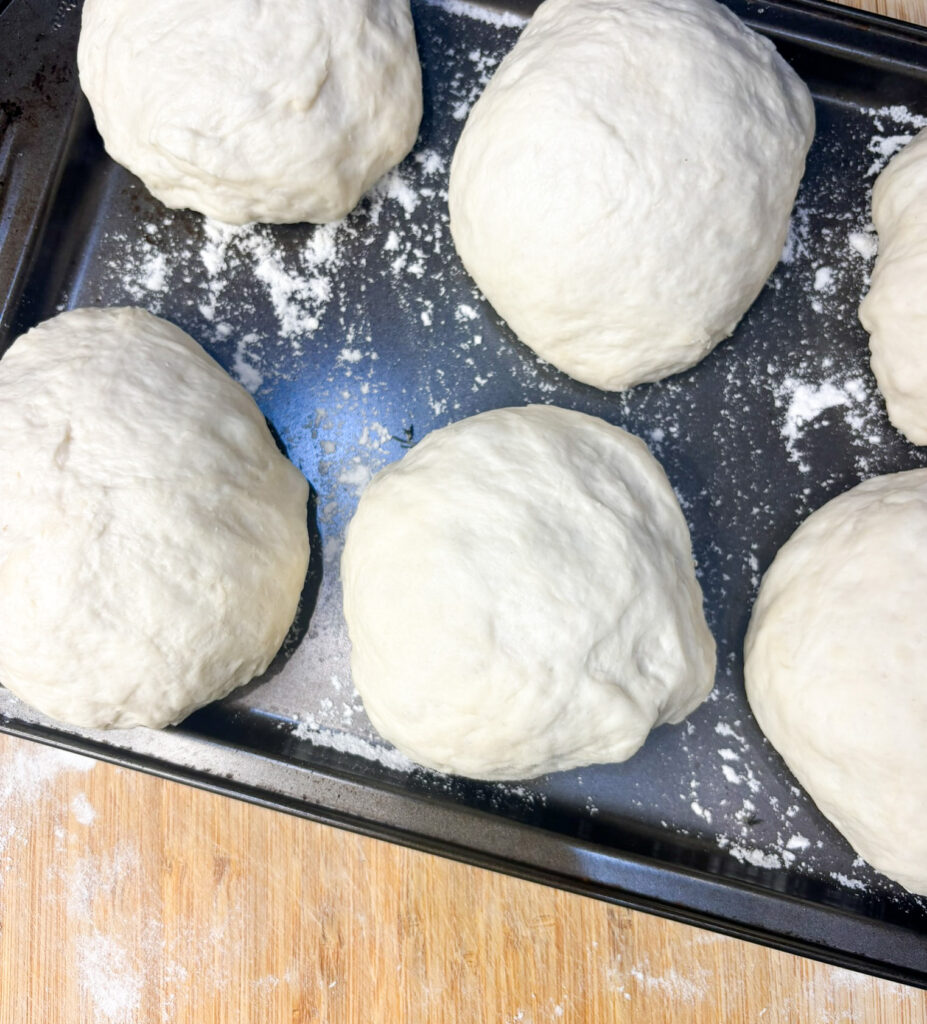
Transfer your rolled dough balls to the prepared baking sheet, covering the finished dough balls with the damp tea towel. Leave a little space of about 1 inch between each so they can continue to rise.
A little side note: if you feel like you’re adding too much flour, don’t worry. Working with dough is sticky, so you need to use a floured surface. When you’re just sprinkling a bit of flour onto your hands or your work surface, you’re not adding enough flour to change the taste or texture of your dough. You likely won’t end up using any more than an extra ¼ cup of flour for ALL the rolling and dusting this recipe requires, which won’t affect the final result.
Allow the dough balls to rest for another 20-30 minutes or until they have increased in size by another 50%. If the environment is cold, this could take up to 1 hour, but I usually find 30 minutes is perfect.
Roll the Dough
Now, it’s really ready. You can definitely rest the dough longer or even overnight. With any dough, flavor develops the longer it rests, so I often transfer the baking sheet of dough balls to the fridge and let them rest overnight. However, I don’t always have that kind of patience. The naan turns out perfect regardless of whether the dough has rested for 2 hours or overnight anyway.
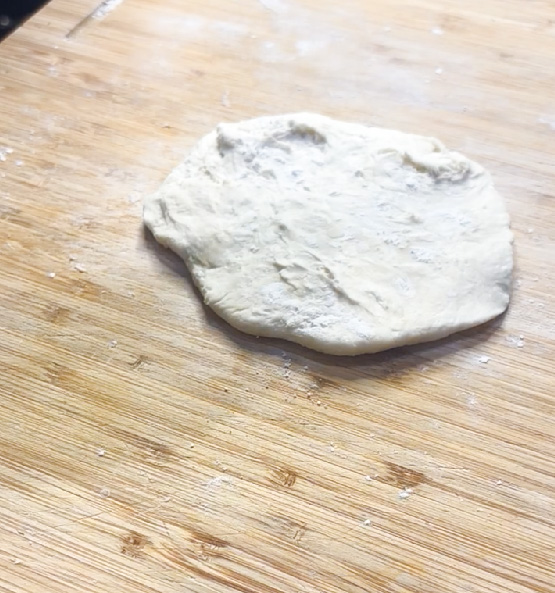
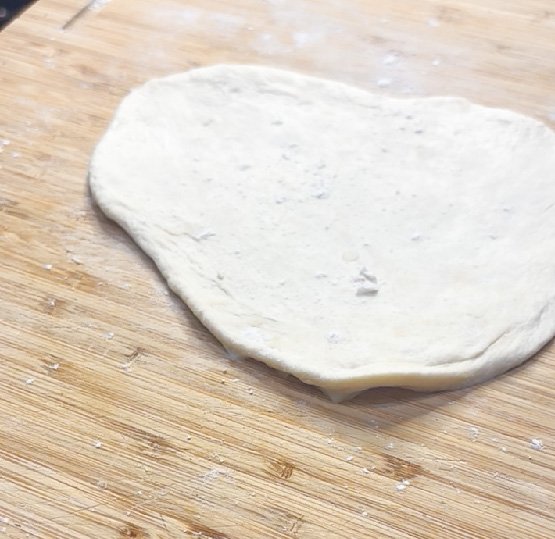
Sprinkle a little more flour over your work surface. Grab a dough ball and gently flatten it. Work one at a time, and leave the remaining dough balls under the damp tea towel. Place the flattened dough ball onto your work surface.
Using a rolling pin, roll out the dough into a circle or oval. If it starts to stick, sprinkle your rolling pin with flour and carefully lift the dough and sprinkle some more flour on your work surface, then continue rolling. You’ll most likely need more flour after 2 or 3 rounds of dough, so sprinkle a little more as you need it. Keep rolling until it’s no more than 3-4 millimeters thick. Measure it if you can. You really want to make sure it’s rolled really thin because if it’s too thick, you won’t get those amazing pockets when it’s baked.
Set aside your rolled dough rounds on a plate. If there’s enough flour between them, you should be able to stack them without the dough sticking together. Or, you can just place some parchment paper in between the dough rounds.
Heat the Skillet
When you’re about halfway through, start heating up your cast iron skillet. Your cast iron should already be seasoned if it’s well loved and used often. If that’s the case, you’re good to go. If not, brush it all over with a very thin layer of neutral oil. Place it over medium-high heat (not all the way to the max heat setting, but almost), and allow it to warm up. If the oil starts to smoke, it’s a bit too hot; reduce the heat just a little to avoid burning the naan.
Meanwhile, repeat the process of rolling out the dough until all dough balls are rolled out to a thickness of 3-4 millimeters.
Bake the Naan
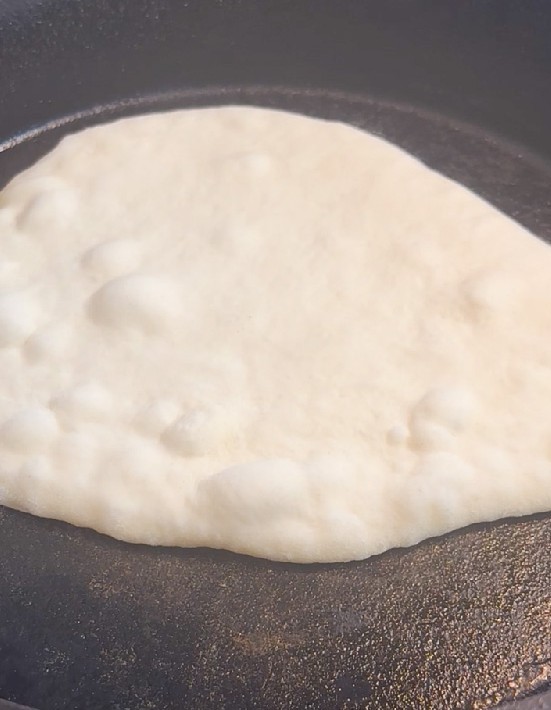
Once your cast iron skillet is heated through, place the first round of dough onto the skillet.
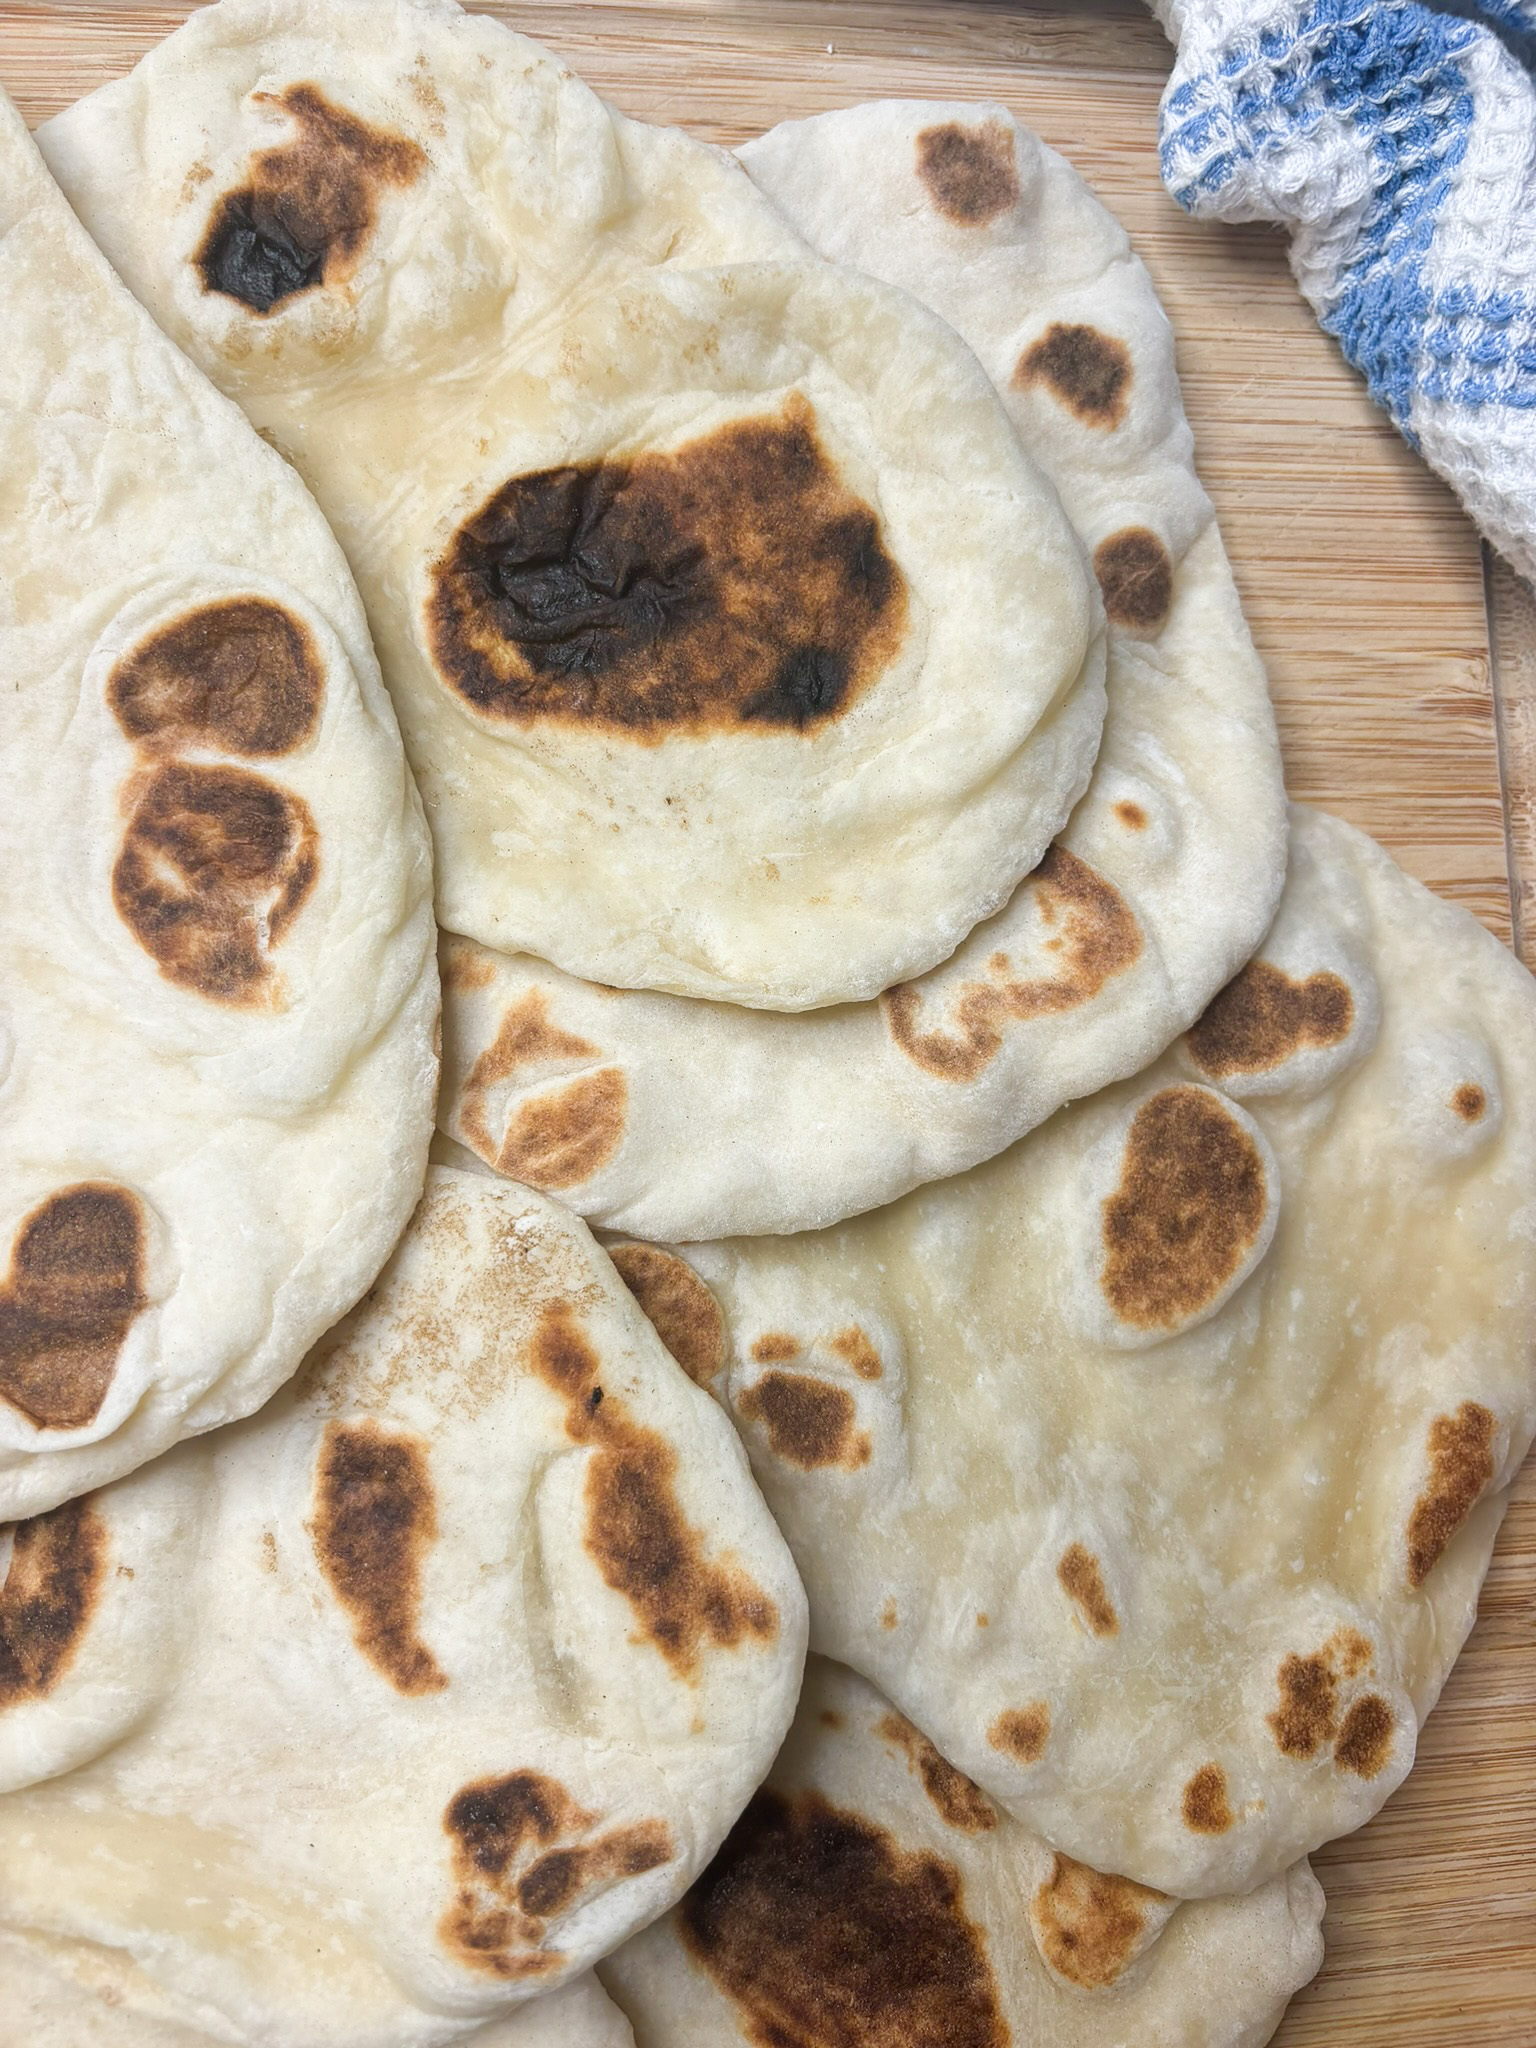
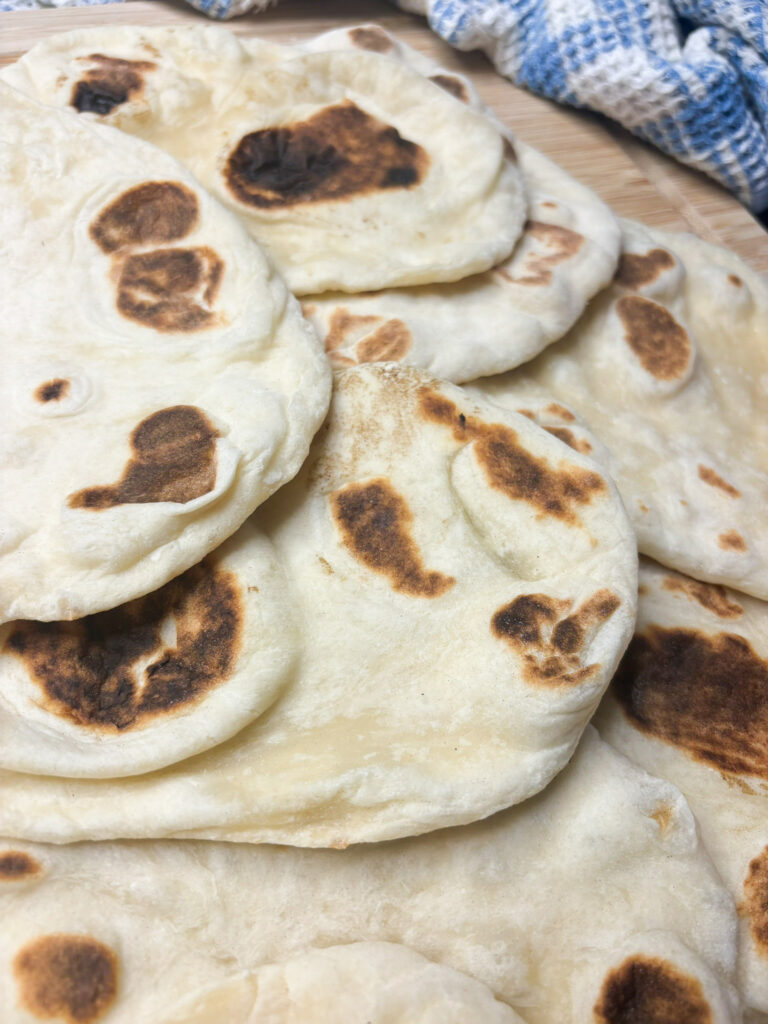
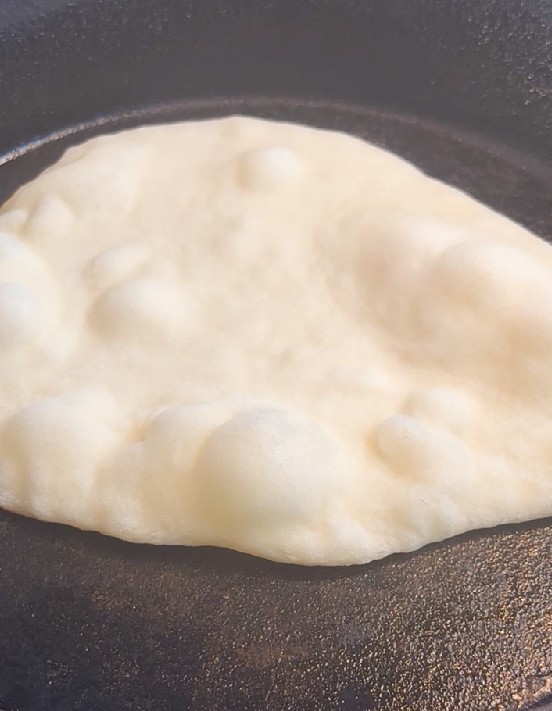
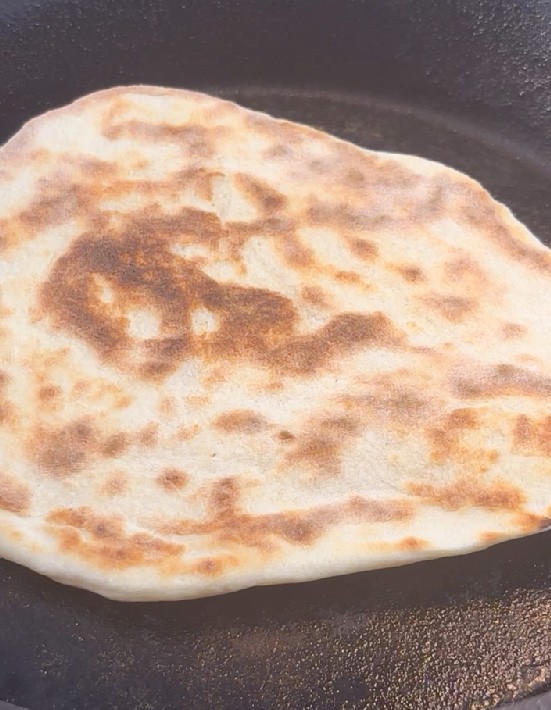
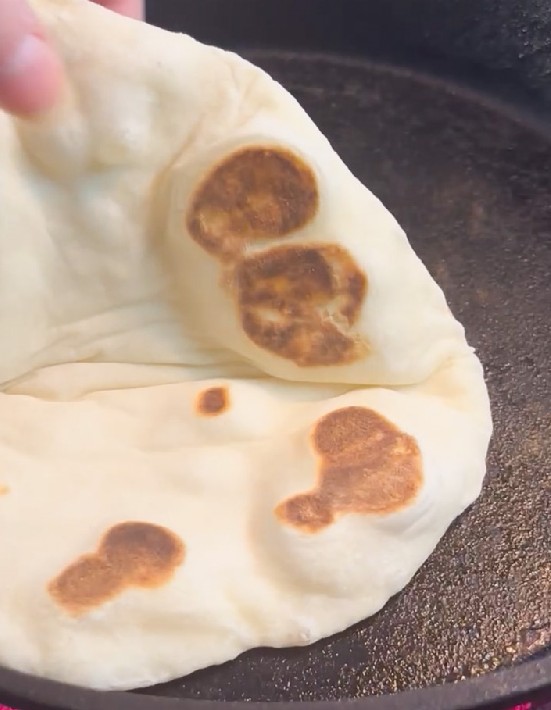
The naan cooks very quickly. You’ll notice the surface starts to bubble after a few seconds. That’s exactly what you want. Without moving the naan, allow it to cook for 1 minute to 1 minute and 30 seconds at the most. To test the cooking time, try letting the first round of dough cook for 1 minute and 30 seconds. Using tongs, lift the naan from the skillet. The bottom should have dark brown char marks, but should not be blackened or burnt. If the bottom is a little burnt, reduce the cooking time for the next pieces to 1 minute. If the bottom is perfectly browned and crispy, continue with the same cooking time.
Flip the naan and place it back in the skillet. At this point, the center of the dough is cooked through. You’re really just cooking the other side to get those nicely charred bubbles and to finish cooking the surface of the naan. Allow the naan to cook for 40 seconds, then remove from the heat with the tongs and check the surface. The bubbles should again be dark brown and charred, but not burnt and cracking. If they’re not quite there yet, place the naan back onto the skillet for an additional 10-15 seconds.
Adjusting the Skillet
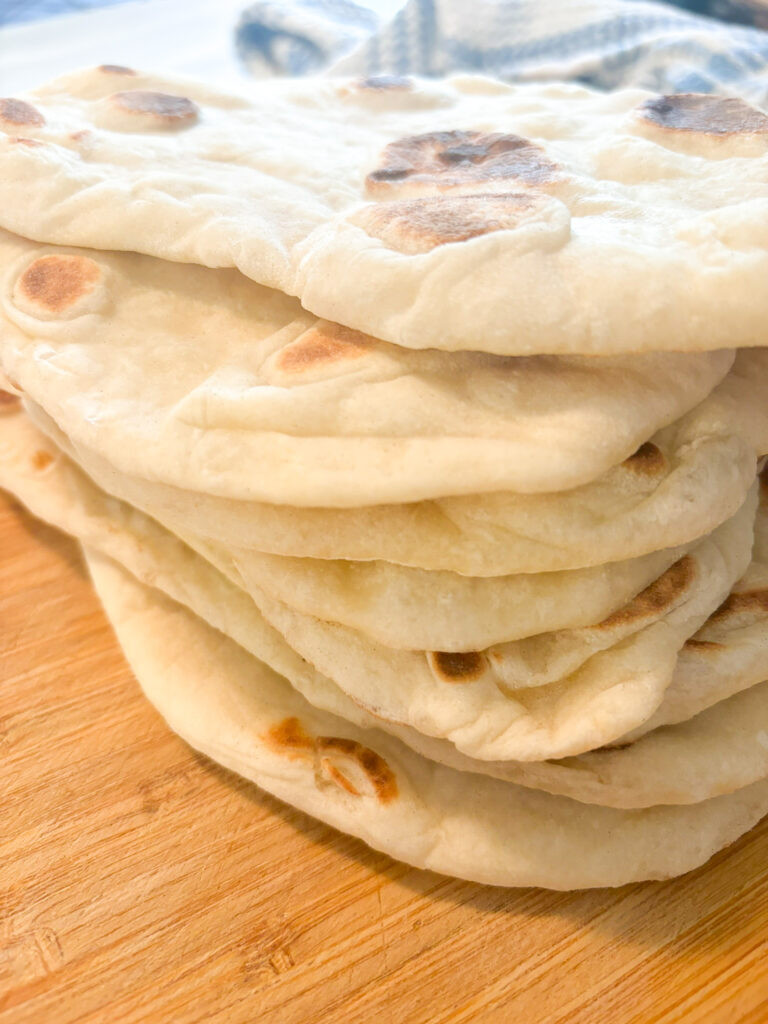
Each naan will be in the skillet for less than 2 minutes. I really meant it when I said it cooks quickly. Set aside cooked the pieces of naan, and repeat the process until all the dough rounds are used up.
You’re likely going to find that you need to adjust the temperature of the skillet at some point to avoid cooking the naan too quickly. As the cast iron skillet sits over the heat and the oil stays hot, the naan may start to burn a little if the temperature is not adjusted.
After about 2-3 pieces of naan, slightly reduce the heat for the next 1-2 pieces, then increase it again if needed for the last few pieces.
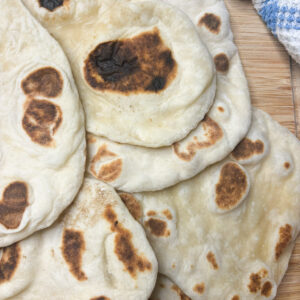
Do one final test to ensure your naan turned out perfectly soft and stretchy: hold up a piece. It should flop, and not stay upright.
Now you have homemade naan from scratch to use for curries or dips. It’s absolutely delicious freshly baked and warm, so I usually eat at least one piece right away too.
Substitution Ideas and Variations
Substitutions
If you don’t have some of the ingredients for this recipe on hand or just don’t like them, here are a few substitution ideas. All substitutions are in equal quantities, or a 1:1 ratio, unless specified:
For the Naan Bread:
- Instant yeast: active dry yeast; let it bloom for 8-10 minutes or as needed until foamy before proceeding with the recipe steps.
- Honey: granulated sugar, brown sugar, coconut sugar, maple syrup or other sweetener of choice.
- Milk: any non-dairy milk of choice.
- Greek yogurt: plain yogurt, sour cream or kefir. If using kefir, you may need to add a little extra flour.
- All purpose flour: use gluten free flour if needed. Some gluten free flours can dry out baked goods. If your naan dough is too thick or feels dry (see photos or video), add an extra ¼ cup of Greek yogurt.
- Avocado oil: olive oil or any other high-smoke point neutral oil.
For the Garlic Butter:
- Unsalted butter: any non-dairy butter of choice.
- Garlic: garlic powder (although fresh garlic gives a much better flavor).
- Fresh cilantro: fresh parsley, or dried cilantro or parsley.
Variations
- Brush with garlic butter: this naan bread can be served plain, or brushed with the garlic butter included in the recipe.
- Add nigella seeds: many authentic naan recipes are finished with a sprinkle of nigella (black cumin) seeds.
Recipe FAQs
What’s the secret to the best naan?
Roll the dough out to exactly 3-4 mm thick to get the perfect charred bubbles and soft, airy interior.
Can I substitute any of the ingredients in this recipe?
Absolutely. You can substitute honey for white sugar if you prefer. I’ve made this recipe with both sugar and honey and both versions are delicious.
If you don’t have Greek yogurt on hand, you can substitute it with any plain yogurt.
You can use active dry yeast or instant yeast interchangeably in this recipe, since we’re letting the instant yeast bloom anyway.
For more suggestions, check the Substitutions section above.
Can I add other ingredients to this recipe?
Definitely. Many authentic naan recipes are finished with a sprinkle of nigella (black cumin) seeds, so feel free to add them if you have some on hand.
To really take this homemade naan to the next level, you can also brush it with a quick and easy garlic butter (see the recipe card below).
For more suggestions, check the Variations section above.
Can I make this naan gluten free?
To make the naan gluten free, substitute the all purpose flour for 1:1 gluten free flour. Some gluten free flours can dry out baked goods despite being labeled 1:1. If your naan dough is too thick or feels dry (see photos or video), add an extra ¼ cup of Greek yogurt.
Can I use a different kind of pan?
A cast iron skillet is the best type for this recipe because it’s great for cooking with high heat. It results in naan that is as close as it can get to restaurant or tandoor oven versions. If you don’t have a cast iron skillet, you can use a different type of large skillet.
Avoid using a non-stick skillet. The naan needs to be cooked at high heat, which can ruin the non-stick coating.
A heavy bottomed stainless steel skillet would work great, or even a Dutch oven. If you’re using stainless steel, ensure it’s heated through and well coated in oil before adding the dough so it doesn’t stick.
The cooking time may vary with a different type of skillet, so keep an eye on the naan. Cast iron is great for conducting heat, so the naan may cook a little slower on a different skillet.
Can I freeze this naan?
The cooked naan freezes beautifully. I like to double the recipe so I can keep a frozen stack on hand. To freeze, place cooked naan in a large resealable bag or container.
How do I store this naan?
Store in the refrigerator in a sealed container or large resealable bag and eat within 5 days. If you plan to finish the naan within 2 to 3 days, you can also store it at room temperature.
More Bread Recipes You Might Like
If you loved this No Knead Homemade Naan Bread, here are some more bread recipes you might want to try:
Recipe Card
Homemade Naan Bread
Equipment
Ingredients
- 1 tsp instant yeast
- ¼ cup warm water (between 100℉-110℉/38℃-44℃; see Note 1)
- 1 tbsp honey
- ¼ cup milk (any percentage works)
- ¼ cup Greek yogurt (or plain yogurt)
- 1 ¾ cups all purpose flour, plus more for rolling (see Note 2)
- ½ tsp salt
- 1 tbsp avocado oil (or other neutral oil), plus more for cooking (see Note 3)
Garlic Butter (Optional)
- ¼ cup unsalted butter, melted
- ¼ tsp salt, or more to taste
- 2-3 cloves garlic, grated
- 2 tbsp fresh cilantro, finely chopped
Instructions
- In a medium bowl, combine the yeast, honey and warm water and whisk together until combined
- Cover with plastic wrap and set aside for around 10 minutes until foamy (it will not bloom the way active yeast would, but will still get foamy)
- In a measuring cup or small bowl, whisk together the milk and yogurt until combined and set aside
- In a large bowl, whisk together the flour and salt
- Move the dry ingredients aside and create a well in the middle of the bowl, then pour in the yeast mixture, the yogurt and milk mixture and the oil
- Using a silicone spatula, mix the dough together until the flour is mostly incorporated (it will be clumpy and sticky with strands of dough; don't worry)
- Once you can no longer mix with a spatula and the dough is starting to form, dust your hands with flour and continue mixing the dough to bring together into a ball (see Note 4); if the dough is too sticky, sprinkle with additional flour
- Cover the bowl with plastic wrap or a clean damp cloth, then leave in a warm place for 1 to 2 hours or until doubled in size (avoid cold countertops)
- When doubled in size, turn the dough over onto a floured surface and cut into 6 or 8 equal pieces depending on the size of naan you prefer
- Roll the pieces into balls, adding flour to your surface as necessary; to ensure the top of the balls are smooth, stretch and tuck the edges underneath (it will be rolled out, so they don't need to be perfect)
- Lightly flour a large plate or baking sheet and place the balls on the sheet and sprinkle them lightly with flour, giving them enough space to increase in size
- Cover the tray with a damp cloth and return to a warm place for 15 to 30 minutes or until increased in size by about 50%
- When the dough is ready, lightly flour a large work surface
- Working one at a time, flatten the dough ball with your hand, then roll into 3-4mm thin rounds; if it starts to stick, sprinkle your rolling pin or work surface with a little flour (you'll probably need to do this after rolling 2 or 3)
- To cook, brush a large cast iron skillet with neutral oil then place over high heat (not cranked all the way up, but almost)
- Place a round of dough in the skillet and cook for 1 to 1 ½ minutes on one side until the underside is golden brown and charred on the edges (the surface will bubble)
- Carefully flip the dough and cook for an additional 40 seconds to 1 minute until the bubbles are charred (the naan will cook really quickly so you don't want to leave it on the skillet for too long)
- Repeat with remaining dough rounds (see Note 5)
- To make the garlic butter, combine melted butter, grated garlic, salt and cilantro and mix until combined
- Brush the garlic butter generously on both sides of the naan and serve.
Notes
Nutrition
Let me know what you think – leave a comment/review
If you made this recipe, I’d love to hear from you! Please consider leaving a review or comment below. Any feedback is appreciated.
Follow me on Social Media
For more recipes, or to see all my recipe videos, follow me on Instagram, Facebook, TikTok and Youtube.